When I originally set out on the DnD character creator, my goal was to make a bunch of implementations of the same API using different flavors of JVM languages: Java, Kotlin, and Scala. However, learning new languages isn’t as fun unless I’m solving new problems with them. If I’m just implementing the same thing over and over again but with different languages, the actual language features and the pros and cons of the language becomes hazy. So instead, I am planning on making a GraphQL API and using some other languages I am somewhat familiar with, but haven’t gotten to use recently.
I am still interested in measuring the differences between solutions here, though. Basic performance testing would be cool. I could orchestrate all that stuff myself, but this is a good chance to try out Istio, which I tried in the past, but I never really got to see the true power. This is way too big of a tool to use for such a small project, but I thought it would be cool to see how some of the out of the box features of Istio work. I could also get some performance comparisons for free which is neat.
In order to use Istio, I need to get my character creator fused with the all powerful Kubernetes, so this article will be about getting the character creator I made in part 3 setup in Kubernetes.
If you want to just go straight to the code checkout the Github repo.
Local Kubernetes Cluster
First you need a local Kubernetes cluster. I use Docker Desktop for all my docker needs, so I figured I would just follow this handy guide to get Kubernetes running there. I won’t rehash the guide here, because their words are much better than mine. I promise.
Cleanup The Client
In Part 3 of this series, I setup a React app for the frontend of the character creator. In my laziness, I just used the React scripts dev command to serve the app, but now that we are going to bigger and better places I decided it would be a good time to just make this an Nginx container to serve up our static files. In order to do this, I’m going to use the sweet multi image functionality for docker images.
Client Docker Image
In the character-builder-client, create a Dockerfile. Thankfully this Dockerfile is short and sweet. First we grab the
node version we want and set our working directory:
FROM node:16-slim as builder

WORKDIR /app
Notice the as builder part above. That will become important later.
After that we need to install our dependencies. This part has always sucked for me when dockerizing NPM projects, because
every time I build the image it has to reinstall all of the dependencies. Well it turns out there is a trick you can use to
only reinstall the dependencies when package.json changes. To do that, add these as the next two lines of the Dockerfile:
# Doing this up front ensures this is only run when package.json changes
COPY package*.json ./
RUN npm install
Now we should have much better build times. Finally we can finish up the npm stuff:
COPY tsconfig.json ./
COPY public/* public/
COPY src/ src/
RUN npm run build
Now we have all of our static files setup. The last step is to get nginx to serve those up. We can now incorporate our
builder image into a new nginx image in the same Dockerfile like this:
FROM nginx:alpine
# Set working directory to nginx asset directory
WORKDIR /usr/share/nginx/html
# Remove default nginx static assets
RUN rm -rf ./*
# Copy static assets from builder stage
COPY --from=builder /app/build .
# Containers run nginx with global directives and daemon off
ENTRYPOINT ["nginx", "-g", "daemon off;"]
The COPY --from=builder grabs all of our static files generated in the builder node image.
Server Dockerfile
The server is much more straight-forward to dockerize. In the java11 folder, create a Dockerfile with the following
contents:
FROM maven:3-adoptopenjdk-11

COPY pom.xml pom.xml
COPY src src/

RUN mvn clean package

EXPOSE 8080
ENTRYPOINT java -jar target/character-creator-1.0.0.jar
Kubernetes Setup
Now that we have dockerized services, we can create the necessary Kubernetes deployments and services. Create a k8s
directory in the root of the character creator directory. We will be adding various yaml files to this directory for
our deployment.
Client
Create a client.deployment.yaml file with the following content:
apiVersion: apps/v1
kind: Deployment
metadata:
  name: rest-client
spec:
  replicas: 1
  selector:
    matchLabels:
      app: rest-client
  template:
    metadata:
      labels:
        app: rest-client
    spec:
      containers:
        - name: rest-client
          image: rest-client
          ports:
            - containerPort: 80
          readinessProbe:
            tcpSocket:
              port: 80
            initialDelaySeconds: 5
This will use a docker image named rest-client, and will expose port 80 for that image which is what nginx is using for
serving our static files in the client. This allows an easy readiness probe to make sure the service is working by checking
port 80.
Create a client.service.yaml file with the following contents:
apiVersion: v1
kind: Service
metadata:
  name: rest-client
  labels:
    app: rest-client
    service: rest-client
spec:
  type: LoadBalancer
  ports:
    - port: 3333
      name: http
      targetPort: 80
      protocol: TCP
  selector:
    app: rest-client
This will expose the service so it can be called within our cluster by referencing rest-client. Originally I was hosting
the client at port 3000, but that conflicts with the Istio Grafana default port so I’m making it unique (3333) to avoid
conflicts.
Server
Create a java.deployment.yaml file in the k8s directory with the following contents:
apiVersion: apps/v1
kind: Deployment
metadata:
  name: java-rest-server
spec:
  replicas: 1
  selector:
    matchLabels:
      app: java-rest-server
  template:
    metadata:
      labels:
        app: java-rest-server
    spec:
      containers:
        - name: java-rest-server
          image: java-rest-server
          ports:
            - containerPort: 8080
          readinessProbe:
            tcpSocket:
              port: 8080
            initialDelaySeconds: 10
This expects a docker image named java-rest-server, and will expose port 8080 for the resulting pod.
Create a java.service.yaml file with the following contents:
apiVersion: v1
kind: Service
metadata:
  name: java-rest-server
  labels:
    app: java-rest-server
    service: java-rest-server
spec:
  type: LoadBalancer
  ports:
    - port: 8888
      name: http
      targetPort: 8080
      protocol: TCP
  selector:
    app: java-rest-server
This will allow our Java rest server to be called within the cluster. I am making the service port 8888 to avoid the Istio 8080 port.
Deployment
Now that we have all our awesome Kubernetes files setup we can actually deploy. However, with how I have stuff setup now
just doing a raw kubectl apply -f k8s/ will not work without port forwarding. The client will try and make calls to
http://localhost:8080 using the browser, but our Java server isn’t available unless you port forward. On top of that,
it will look for local Docker images with the appropriate names, but we haven’t actually built them. Shockingly that’s not
just because I’m lazy, it’s because I want to use Skaffold to manage all that crap for me.
Skaffold is extremely useful for local dev work in Kubernetes. It will handle building images, setting up everything in
Kubernetes, and port forwarding the various services so you can hit them outside the cluster. To set it up, all you need
to do is create a skaffold.yaml file in the root of the character creator directory with the following contents:
apiVersion: skaffold/v2beta19
kind: Config
build:
  tagPolicy:
    sha256: {}
  artifacts:
  - context: java11/
    image: java-rest-server
  - context: character-builder-client/
    image: rest-client
deploy:
  kubectl:
    manifests:
    - k8s/**
profiles:
  - name: minikube
    deploy:
      kubeContext: minikube
  - name: docker-desktop
    deploy:
      kubeContext: docker-desktop
The build config tells Skaffold where to find the docker file specifications, and how to tag them. In our case it will
just hash the contents of the Dockerfile so it is a unique tag every time you change it. I then tell it what to name
the docker images that were built, so I make sure the names match what I setup in my Kubernetes deployments.
The deploy section just says where to find all of your Kubernetes specs, so I just tell it to use kubectl apply for
everything in the k8s directory. It will handle port forwarding automatically if you use the correct flags when running
skaffold.
Finally the profiles section defines which contexts you want Skaffold to know about, I’m adding minikube here as an
example of providing alternative Kubernetes environments to deploy to.
To actually deploy, I use the VS code plugin Cloud Code that can setup debugging and gives super helpful logging. You can
also use skaffold on the command line and use the various flags to make sure port forwarding, debugging, and all that
jazz is setup properly.
When all of that is setup and ready to go, running Skaffold via the command line or a plugin should launch the services
and port forward, so you can hit http://localhost:3333 and see the app working like before. Sweet.
Istio
Setup
Now that we have the application running in Kubernetes land, we can get on to the more interesting part: Istio. Follow
the steps in the download and
install sections of the Istio docs, but be warned if when you
do the kubectl label namespace default istio-injection=enabled command it will cause a LOT of pods to start running in
your default namespace, and a bunch of Istio orchestration will auto deploy along with anything you launch in the default
namespace. So if you want a little more control, make a separate namespace for your Istio testing.
Gateway
Cool we have Istio installed, but I want to get an actual application map up. Istio automatically deploys sidecars to collect various data for each of the pods and services being deployed, but if I want an overarching view into the app I will need to create a Gateway. Thankfully this is pretty straightforward, I just need to define some simple mapping rules to go to either the client or the server.
Create a new istio-gateway.yaml file in the k8s/ directory. In here we will define a
Gateway and a
Virtual Service. The gateway just configures
the load balancer that will route to our various services, so we need to define which hosts and ports this gateway will use:
apiVersion: networking.istio.io/v1alpha3
kind: Gateway
metadata:
  name: character-creator-gateway
spec:
  selector:
    istio: ingressgateway # use istio default controller
  servers:
    - port:
        number: 80
        name: http
        protocol: HTTP
      hosts:
        - "*"
We are just going to use the built in Istio ingress gateway, which exposes port 80 as an HTTP port. Since we are going to
be using this for local dev purposes, I’m using * as the hosts so that I don’t have to worry about setting a Host header
or any of that other stuff.
In that same file, create a virtual service to map to the client and the server appropriately:
apiVersion: networking.istio.io/v1alpha3
kind: VirtualService
metadata:
  name: character-creator
spec:
  hosts:
    - "*"
  gateways:
    - character-creator-gateway
  http:
    - name: rest-server-route
      match:
        - uri:
            prefix: /character-builder/v1
      route:
        - destination:
            host: java-rest-server
            port:
              number: 8080
    - name: client-route
      route:
        - destination:
            host: rest-client
            port:
              number: 3000
This sets up two routes using our gateway. The first will map all calls to /character-builder/v1 to our server
using the same URL provided, meaning the routes we set up in the app will still work which is awesome. All other routes
will get mapped to the client to ensure the static content loads appropriately.
Once we start this up, we can visit http://localhost and the app works! However, it is bypassing the gateway and hitting
the port forwarded server directly. We don’t want that. To fix it, we shall update the client code to hit the new URL for
the API, which is just localhost without the :8080. Open the character-builder-client/src/client/core/OpenApi.ts file
and edit the BASE config value to be http://localhost/character-builder/v1.
Now the app will actually work and everything is routed through the gateway. Finally we can see some metrics and our fancy app map!
Kiali Dashboard
In order to run the Kiali dashboard, run istioctl dashboard kiali. When it loads up, you will see… well not a lot.
If you installed the demo Istio profile, then just hit the app a few times by visiting http://localhost and you
will see an app map like this:

Notice the gateway is routing to both of our running apps, since we are making calls to the server from the user’s browser rather than having services call each other directly. Once we get some more interesting services running, this map should be more involved.
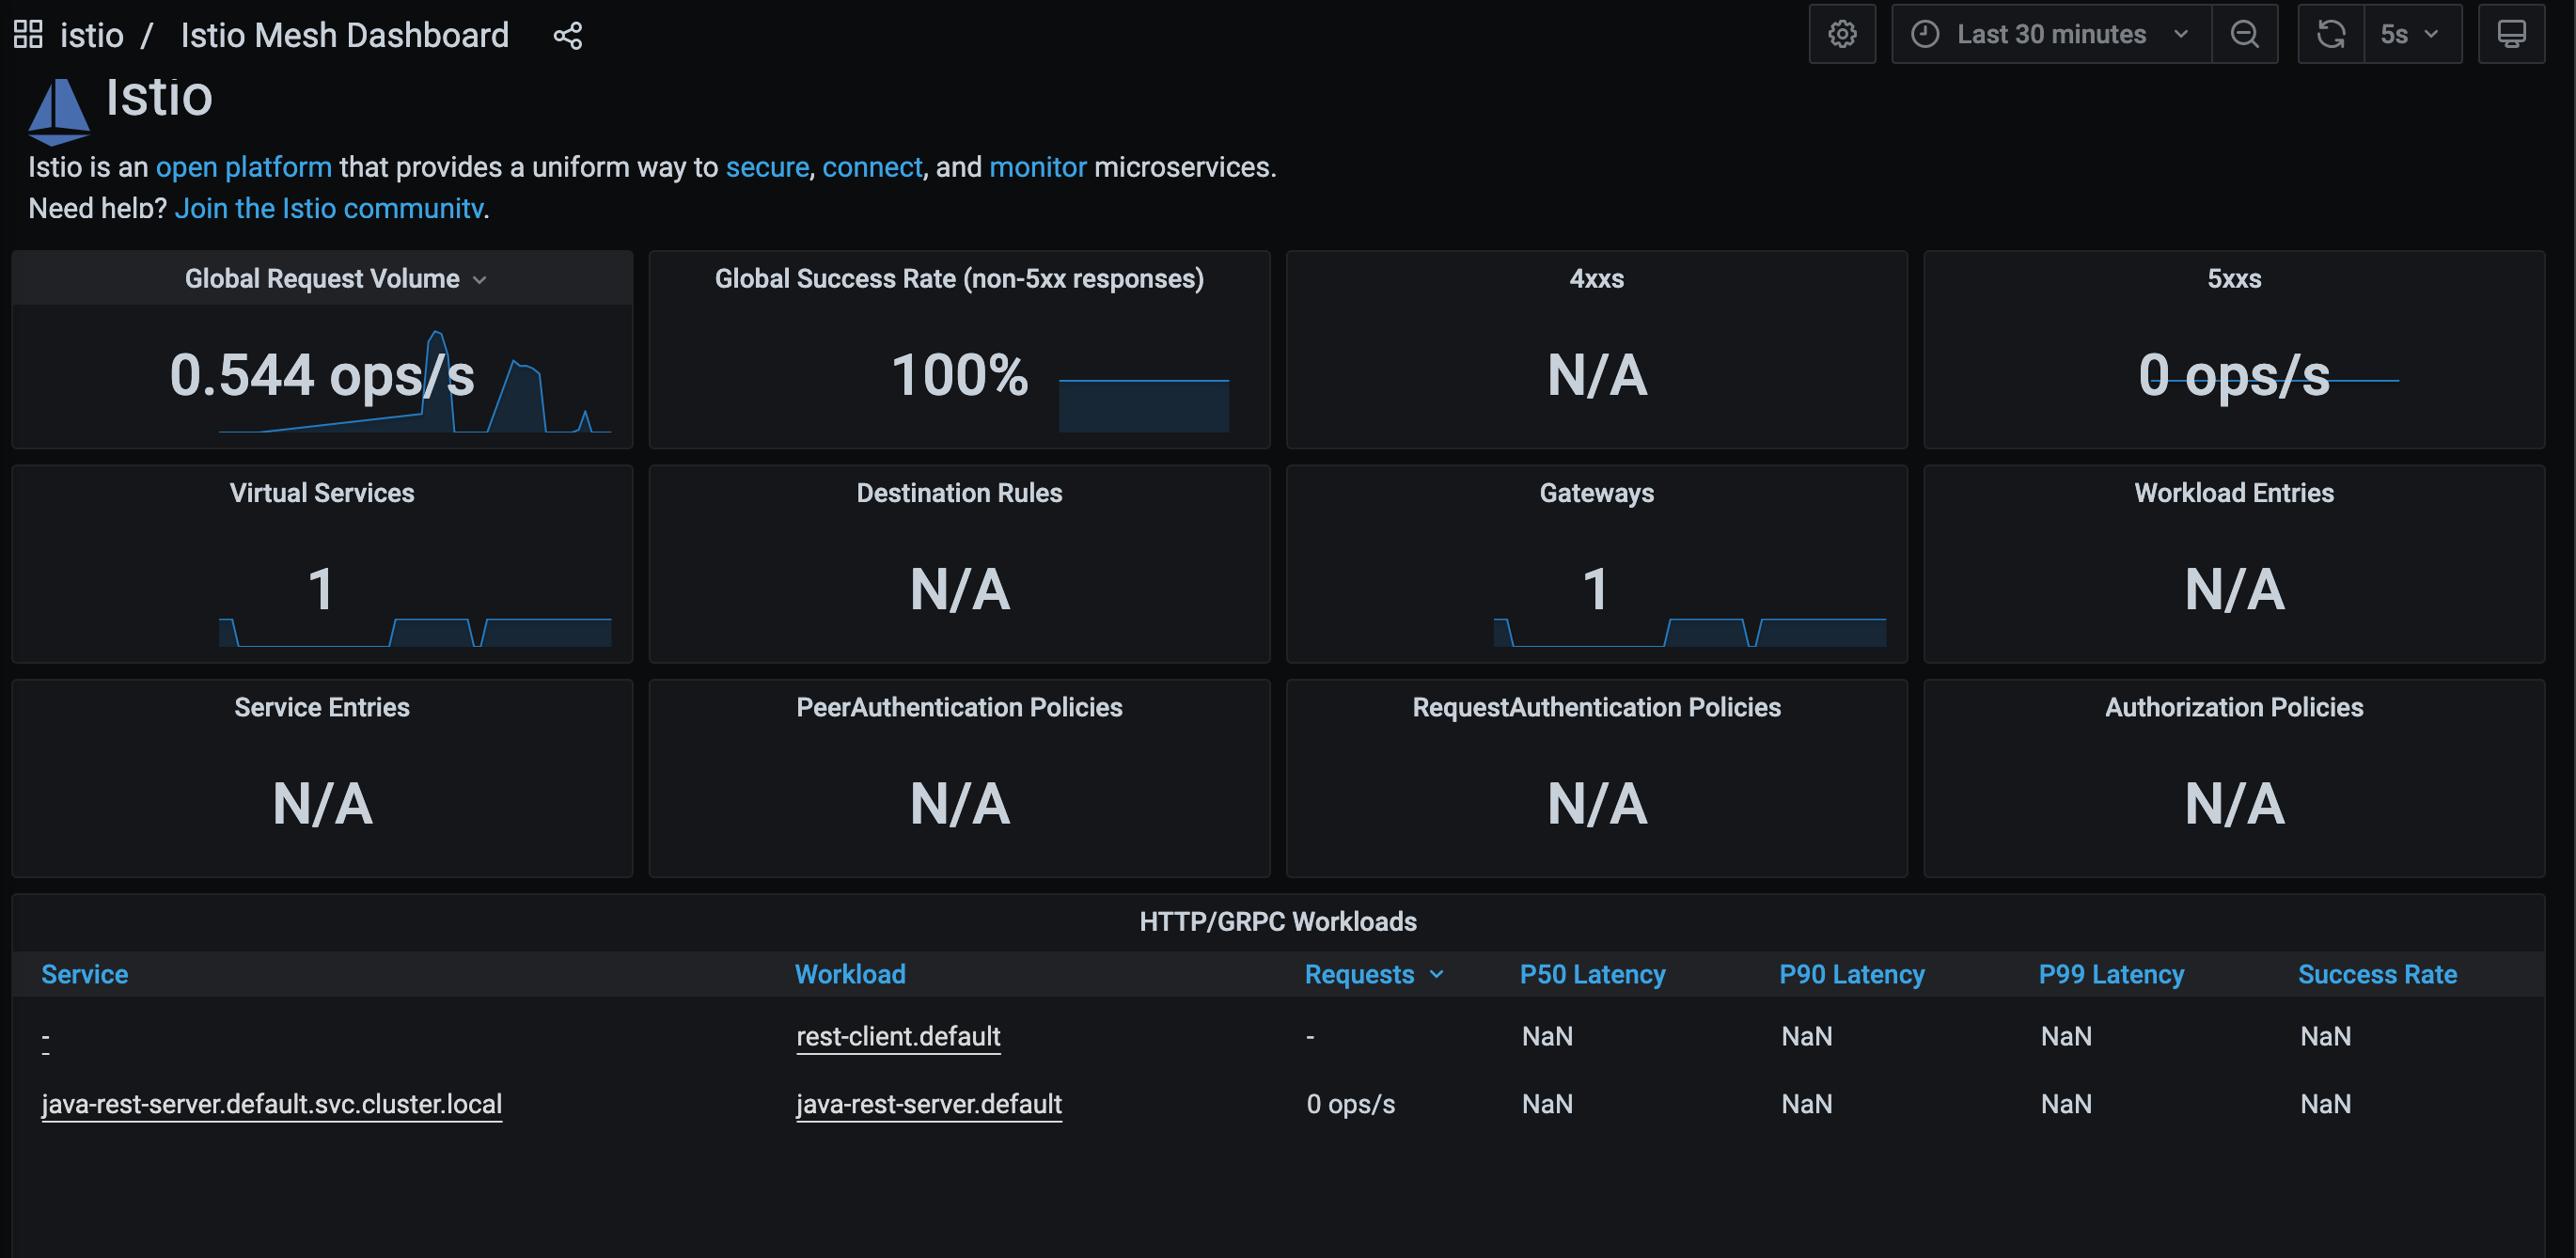
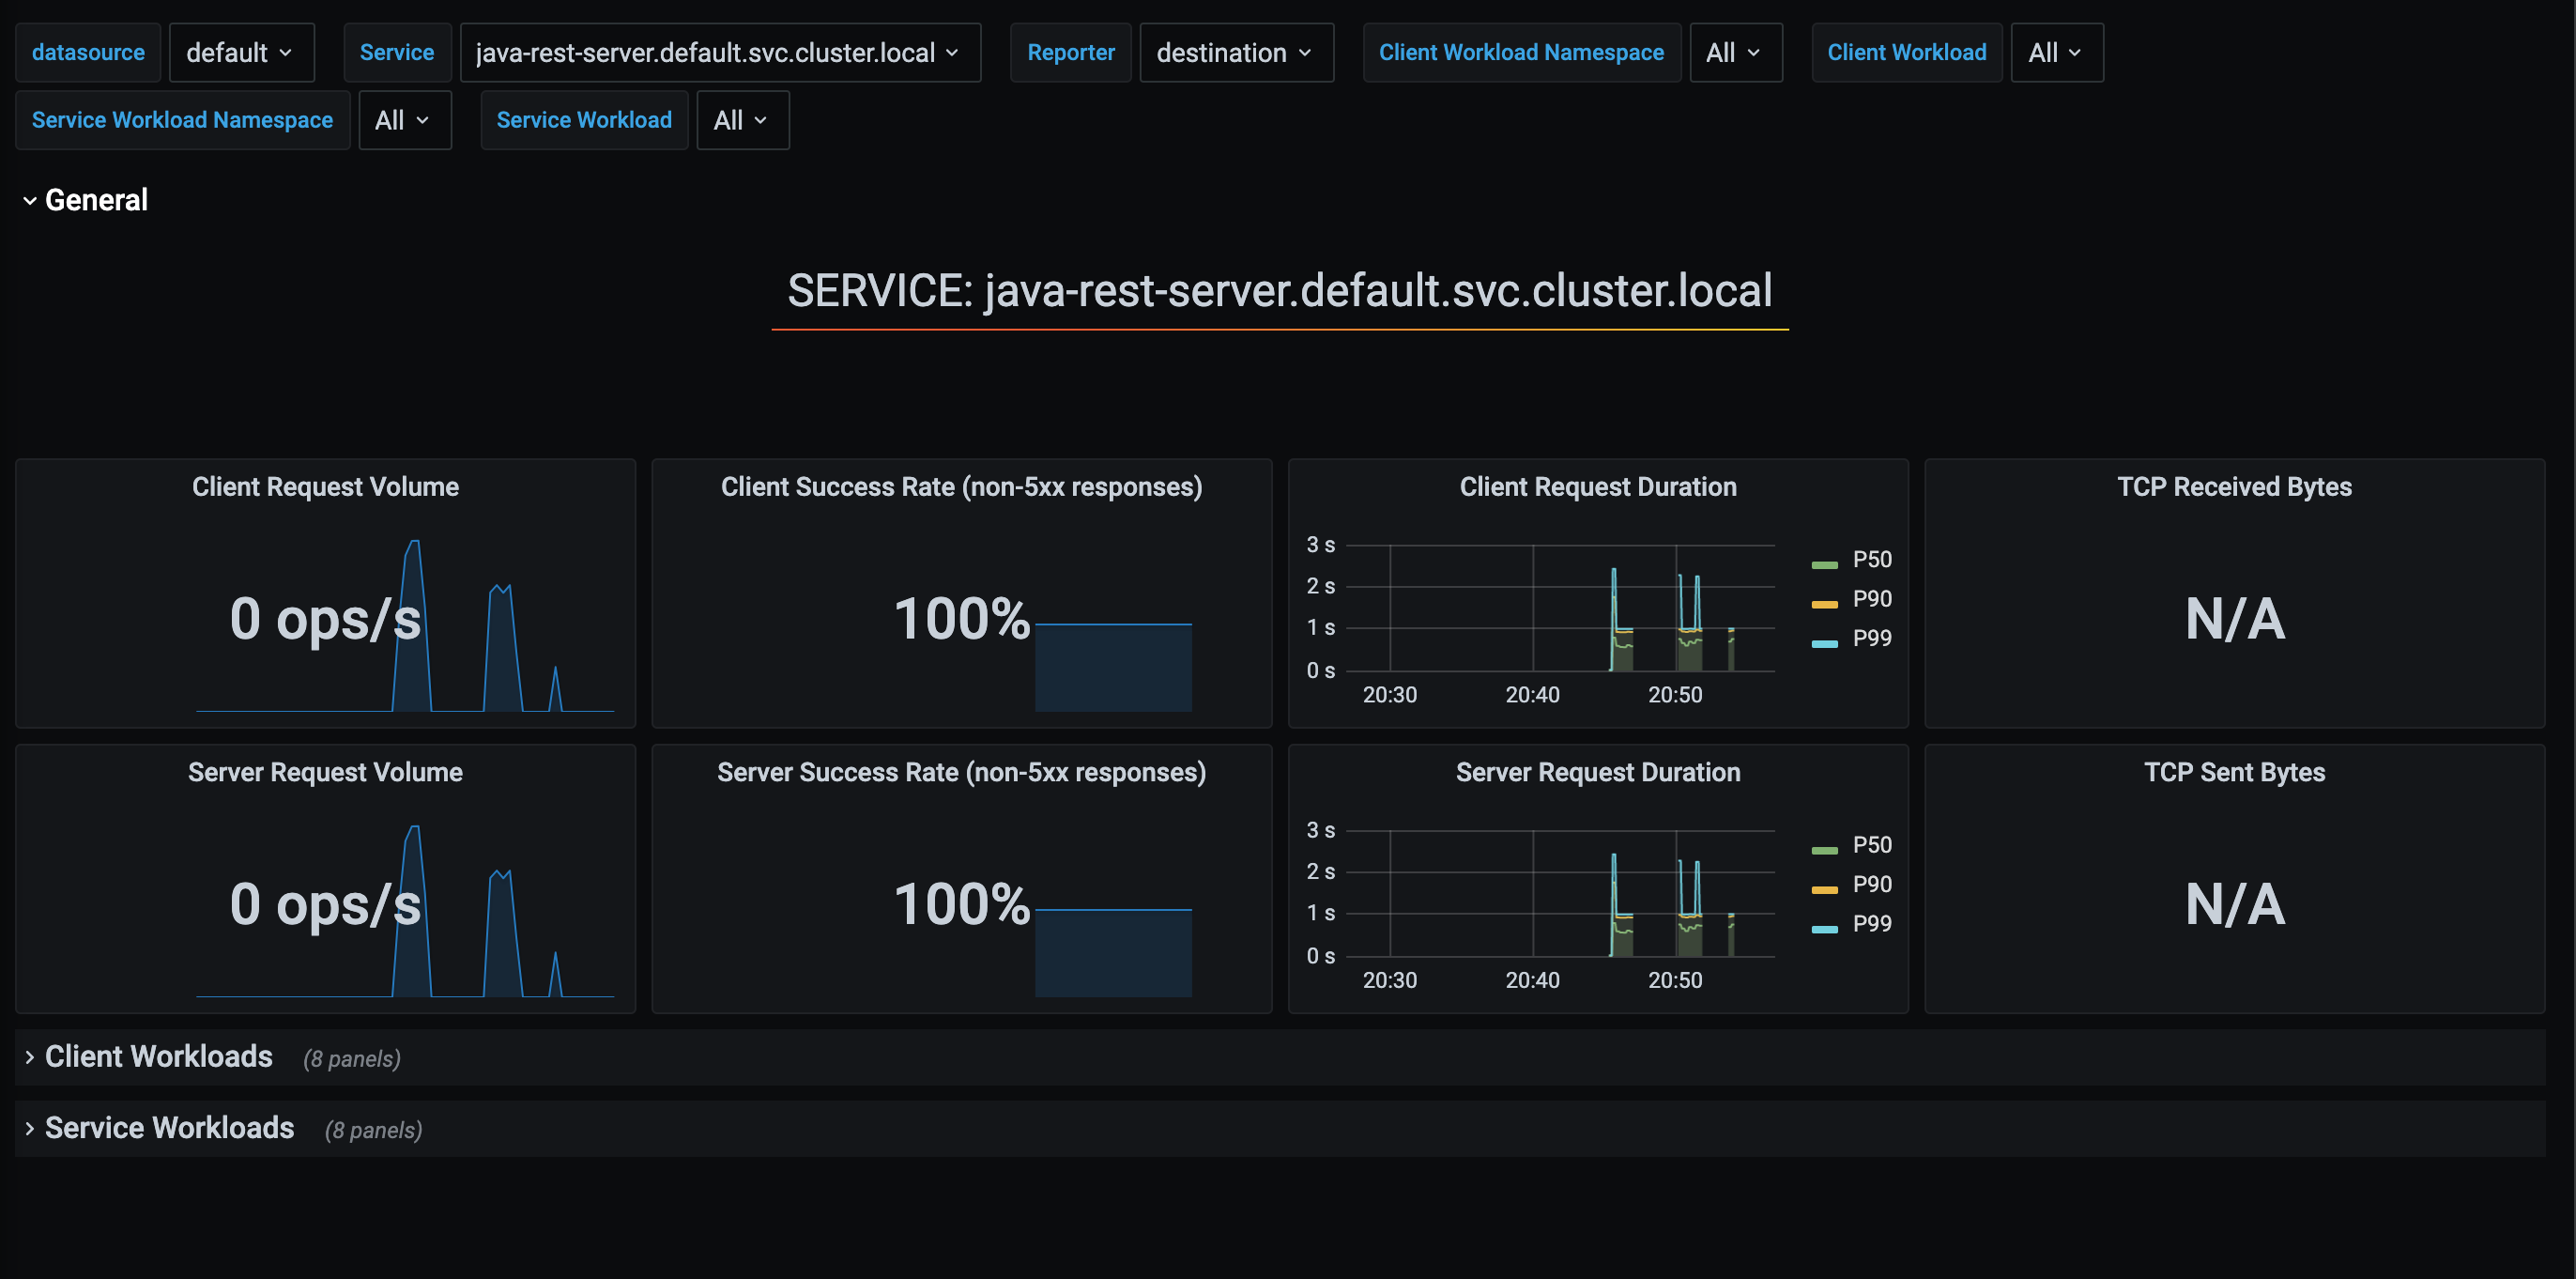
Grafana Dashboard
We also get some sweet sweet metrics for free by running Istio. Like with the Kiali dashboard, you can run
istioctl dashboard grafana to get get the Grafana dashboard. If you check out the dashboards, we get a bunch of ones
for free from Istio. The two interesting ones for us would be the mesh and the services dashboard that can give us
data about our running services:
What’s Next
Now the goal will be to make a bunch more services using different languages and frameworks so we can start doing some interesting routing and performance testing. I’m sure it will end up being 12 more parts, so look forward to that. So much more rambling to do.